Wednesday, November 3, 2010

Alfresco Task History

Article reference from

Step1 : Download entire code from  taskhistory.zip

Step2: Go to tomcat\webapps\alfresco\WEB-INF replace  faces-config-custom.xml with your downloaded  file.

Step3: Go to tomcat\webapps\alfresco\jsp\content  replace  document-details.jsp with your downloaded  file.

Step4: Go to tomcat\webapps\alfresco\WEB-INF\classes\alfresco\messages add your code into   webclient.properties don't replace the file.

Step5: Go to tomcat\webapps\alfresco\WEB-INF\lib and add custom-jsp.jar

Step6: Restart the server


Tuesday, November 2, 2010

Workflow in Share

Hi

here i  will explain about workflows in share , it will work for enterprise and community editions also with 3.4 version.

Step1: we can start work flow in two ways

a) From actions along right side on an item row in the list of Document Library items

b) By Clicking on the "Start Workflow" action links on document details page


Step2: after click on "start workflow",  you will get start work flow page with drop down on that page like as follows


Step3: For example select Adhoc (Assign task to colleague) from the drop down, then it will displays a form to enter parameters that defines work flow.  


If we need to add new custom work flow  follows these steps ( code from wiki page http://wiki.alfresco.com/wiki/WorkflowSample_Lifecycle)

Step4:  Go to \shared\classes\alfresco\extension folder  rename 

lifecycle_processdefinition.xml.sample to   lifecycle_processdefinition.xml
lifecycle-workflow-context.xml.sample to   lifecycle-workflow-context.xml
lifecycleModel.xml.sample to   lifecycleModel.xml
lifecycle-messages.properties.sample to    lifecycle-messages.properties

if you are not able to find those files copy these code and place those files into   \shared\classes\alfresco\extension folder 


Custom WorkFlow Code

Step5:  type this url in browser http://localhost:8080/alfresco/faces/jsp/admin/workflow-console.jsp

then enter

  deploy alfresco/extension/lifecycle_processdefinition.xml

Click on submit.


Step5: Restart the server then follow above procedure you will get your custom work flow in start workflow drop down list as shown

Thursday, August 12, 2010

Alfresco : JMX

JMX means Java Management Extensions (JMX) Technology

                                           The JMX technology provides the tools for building distributed, Web-based, modular and dynamic solutions for managing and monitoring devices, applications, and service-driven networks. By design, this standard is suitable for adapting legacy systems, implementing new management and monitoring solutions, and plugging into those of the future.

JMX in Alfresco
                        By default, system administrators can reconfigure Alfresco by shutting down the server, editing certain property and configuration files and then restarting the server. However, there are certain support operations that System Administrators would like to perform on-demand at runtime without needing to restart the server. For example, it should be possible to temporarily change log levels in order to debug and/or troubleshoot a live system.
                          In addition, as an Enterprise Only feature, Alfresco contains various subsystems that may be configured and restarted without needing to restart the entire alfresco repository.

In order to open JMX 

Step1: Start Alfresco

Step2:Go  C:\Program Files (x86)\Java\jdk1.6.0_18\bin ,(i.e., /bin/jconsole. ) double click on jconsole.exe this will open screen like as follows.

             select Local Process and enter 
                        JMX Username: controlRole
                        JMX Password: change_asap  and then click on Connect.


then select Bean you can made change as you like the window will like follows.


The best way to tell what all of your properties are is to hit: 
                    http://localhost:8080/alfresco/faces/jsp/admin/jmx-dumper.jsp 

Friday, July 9, 2010

Java-Backed Web Scripts

Hi., in this article i will explain about how to write Java backed web script in alfresco,if you are new to java this article may more helpful to you.just i will explain more which we have same thing in wiki i.e., http://wiki.alfresco.com/wiki/Java-backed_Web_Scripts_Samples  

                      Java class is the controller rather than JavaScript .basically JavaScript is very light weighted language even we can write webscrpit using simple JavaScript but there are some reasons to write using Java.

1.accessing alfresco application services not available via JavaScript API
2.when the performance is absolutely critical
3.to get tighter control of the generated response.
4.when we need to access the Alfresco API
5.if we prefer stronger programming language like JAVA

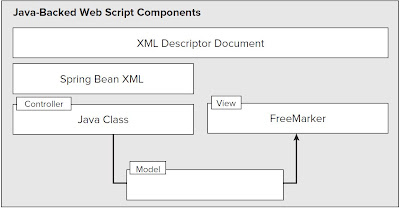
the construction view for this script is shown below.


Example1:
                    in this example i will explain simple java backed webscript  step wise which is in http://wiki.alfresco.com/wiki/Java-backed_Web_Scripts_Samples


Step1: use eclipse  to get the class file for a java code very easily.here i am using in same way.

a) create a java project in eclipse name it as java-backed-webscripts
b)create a folder and name it as lib import the jar files to this file from                 \tomcat\webapps\alfresco\WEB-INF\lib
c)create on more folder in the project and name it as source
d)right click the source folder then go to new>file name it as SimpleWebSript.java
                copy the below code in that
--------------------------------------------------------------------------------------------------------
package org.alfresco.module.demoscripts;

import java.io.IOException;

import org.alfresco.web.scripts.AbstractWebScript;
import org.alfresco.web.scripts.WebScriptException;
import org.alfresco.web.scripts.WebScriptRequest;
import org.alfresco.web.scripts.WebScriptResponse;
import org.json.JSONException;
import org.json.JSONObject;

public class SimpleWebScript extends AbstractWebScript
{
    public void execute(WebScriptRequest req, WebScriptResponse res)
        throws IOException
    {
     try
     {
    // build a json object
    JSONObject obj = new JSONObject();
   
    // put some data on it
    obj.put("field1", "data1");
   
    // build a JSON string and send it back
    String jsonString = obj.toString();
    res.getWriter().write(jsonString);
     }
     catch(JSONException e)
     {
     throw new WebScriptException("Unable to serialize JSON");
     }
    }    
}

-------------------------------------------------------------------------------------------------


d)right click on the project and new>file -- create a file with the name build.xml
                  copy the code ass shown below.

------------------------------------------------------------------------------------------------------
<?xml version="1.0"?>

<project name="Sample Module" default="package-amp" basedir=".">

<property name="project.dir" value="." />
<property file="${project.dir}/build.properties" />
<property file="${project.dir}/module.properties" />

<property name="build.dir" value="${project.dir}/build" />
<property name="config.dir" value="${project.dir}/config" />
<property name="jar.file" value="${build.dir}/lib/${module.id}.jar" />
<property name="amp.file" value="${build.dir}/dist/${module.id}.amp" />

<target name="mkdirs">
<mkdir dir="${build.dir}/dist" />
<mkdir dir="${build.dir}/lib" />
<mkdir dir="${build.dir}/classes" />
</target>

<path id="class.path">
<dirset dir="${build.dir}" />
<fileset dir="${project.dir}/lib" includes="**/*.jar" />
</path>

<target name="clean">
<delete dir="${build.dir}" />
</target>

<target name="compile" depends="mkdirs">
<javac classpathref="class.path" debug="${debug}" srcdir="${project.dir}/source/java" destdir="${build.dir}/classes" target="1.5" encoding="UTF-8" />
<copy todir="${build.dir}/classes">
<fileset dir="${project.dir}/source/java" defaultexcludes="false">
<exclude name="**/*.java" />
<exclude name="**/.svn/**" />
<exclude name="**/CVS/**" />
</fileset>
</copy>
</target>

<target name="package-jar" depends="compile">
<jar destfile="${jar.file}" encoding="UTF-8">
<fileset dir="${build.dir}/classes" excludes="**/custom*,**/*Test*" defaultexcludes="false" />
</jar>
</target>

<target name="package-amp" depends="package-jar" description="Package the Module">
</target>
</project>

----------------------------------------------------------------------------------------------------


e)create one more file  module.properties

module.id=JavaBackedWebScript
module.title=test web script
module.description=Project to get class file for webscripts
module.version=1.0

f)then right click on build.xml  --> run as --> AntBuild

it will create a class file and jar file. in build folder. copy this jar file and paste it into  \tomcat\webapps\alfresco\WEB-INF\lib.

Step2: next  step is to declaring the webscript to spring  add the below code in web-scripts-application-context.xml, which is  /tomcat/webapps/alfresco/WEB-INF/classes/alfresco

<bean id="webscript.org.alfresco.demo.simple.get" 
      class="org.alfresco.module.demoscripts.SimpleWebScript"
      parent="webscript">
</bean>

Step3: next go to /tomcat/webapps/alfresco/WEB-INF/classes/alfresco/templates/webscripts/org/alfresco and create a folder and name it as demo

and then create a file in this folder with the name simple.get.desc.xml then add the below code in that  

<webscript>
  <shortname>The World's Simplest Webscript</shortname>
  <description>Hands back a little bit of JSON</description>
  <url>/demo/simple</url>
  <authentication>none</authentication>
  <format default="">argument</format>
</webscript>

Step4:  Just  restart the server and type this url in the browser 

      http://localhost:8080/alfresco/service/demo/simple

the JSON will return { “field1” : “data1” } 


Example 2:

Monday, June 14, 2010

Alfresco-Google Docs Integration

Steps For Google Docs Integration in Alfresco


this is integration in alfresco 3.3 version

step1: Goto tomcat\shared\classes\alfresco\web-extension

rename share-config-custom.xml.sample to share-config-custom.xml

step2: open share-config-custom.xml file and false to true which is in bold.

<google-docs>
<!--
Enable/disable the Google Docs UI integration (Extra types on Create Content menu, Google Docs actions).
If enabled, remember to also make sure the gd:googleEditable aspect is made visible in the <aspects> section above.
-->
<enabled>true</enabled>

<!--
The mimetypes of documents Google Docs allows you to create via the Share interface.
The I18N label is created from the "type" attribute, e.g. google-docs.doc=Google Docs&trade; Document
-->
<creatable-types>
<creatable type="doc">application/msword</creatable>
<creatable type="xls">application/vnd.ms-excel</creatable>
<creatable type="ppt">application/vnd.ms-powerpoint</creatable>
</creatable-types>
</google-docs>


step3:

add aspect <aspect name="gd:googleEditable" />

step4:

Add this to your alfresco-global properties

# GoogleDocs configuration
googledocs.googleeditable.enabled=true
googledocs.username=yourname@youraddress.com
googledocs.password=yourgooglepassword

log4j.logger.org.alfresco.repo.googledocs=debug

step5: resart the tomcat server.

Here Added video tutorial from YouTube


Wednesday, April 28, 2010

Code to Hide Actions in Alfresco

Here i added code to hide delete option on space and document in alfresco, add the following code in web-client-config-custom.xml

<config>
<actions>
<action-group id="space_browse">
<show-link>false</show-link>
<action idref="delete_space" hide="true" />
</action-group>

<action-group id="browse_actions_menu">
<show-link>false</show-link>
<action idref="delete_space" hide="true" />
</action-group>


<action-group id="doc_details_actions">
<action idref="delete_doc" hide="true" />
</action-group>


<action-group id="space_details_actions">
<action idref="delete_space" hide="true" />
</action-group>

<action-group id="document_browse">
<show-link>false</show-link>
<action idref="delete_doc" hide="true" />
</action-group>

<action-group id="document_browse_menu">
<action idref="delete_space" hide="true" />
</action-group>

<action-group id="space_browse_menu">
<action idref="delete_space" hide="true" />
</action-group>

</actions>
</config>


Here i added code to hide copy & cut  options on space and document in alfresco, add the following code in web-client-config-custom.xml

<config>
<actions>
<action-group id="space_browse">
<show-link>false</show-link>
<action idref="cut_node" hide="true" />
<action idref="copy_node" hide="true" />
</action-group>

<action-group id="browse_actions_menu">
<show-link>false</show-link>
<action idref="cut_node" hide="true" />
<action idref="copy_node" hide="true" />
</action-group>

<action-group id="doc_details_actions">
<action idref="cut_node" hide="true" />
<action idref="copy_node" hide="true" />
</action-group>

<action-group id="space_details_actions">
<action idref="cut_node" hide="true" />
<action idref="copy_node" hide="true" />
</action-group>

<action-group id="document_browse">
<show-link>false</show-link>
<action idref="cut_node" hide="true" />
<action idref="copy_node" hide="true" />
</action-group>

<action-group id="document_browse_menu">
<action idref="cut_node" hide="true" />
<action idref="copy_node" hide="true" />
</action-group>

<action-group id="space_browse_menu">
<action idref="cut_node" hide="true" />
<action idref="copy_node" hide="true" />
</action-group>
</actions>
</config>

Monday, April 19, 2010

Alfresco Outlook configuration for IMAP

Follow these steps to configure outlook send mail to alfresco

step1:  go to  C:\Windows\System32\drivers\etc

here add  server name. just for testing i  added chandu.com as follows

127.0.0.1 chandu.com

Step2:  next open Microsoft outlook ., select  tools > account settings.

click on new ... it will open a wind follow some steps to add a new account

a.select Microsoft POP3,IMAP, HTTP.... click next
b. select manually configure server settings...... click next
c.select internet Email
d.fill the details as follows
----------------------------------------------------------------------------------
         your name                  :             pradeep
         EmailAdd                   :             pradeep@chandu.com
  Server Information
         Account Type             :            IMAP
         Incoming mail Ser        :           chandu.com
         Outgoing Mail ser        :           chandu.com
Logon Information
         username                    :            pradeep
         password                    :            *********
-----------------------------------------------------------------------------------

Click on next and finish.

Step3: all the above configuration is in outlook now., just  login to alfresco go to Administration Console
Click on Manage system users --> create user

then fill the new wizard details., make sure that  email id is pradeep@chandu.com


just finish that wizard.

Step4:  then go to company home and create one space., name it as you like., here i am creating the space with the name mycompany.
      click on mycompany -- > view details --> manage space users --> invite user.
search for the user pradeep and add that user as contributor or what ever that you want but make sure about permissions, 


Step5: go to mycompany space and go to view details and click on run action ., it will open run action wizard
select add aspect  and click on set values and add,  select Email Alias , then click on next  and finish that wizard.
 next edit this space property., and create Email Alias as some companyadmin


Step6: go to   \tomcat\shared\classes\alfresco\extension

unzip the custom-email-server.sample.zip file and change  custom-email-server.properties as follows


# Email Server properties
email.server.enabled=true
email.server.port=25
email.server.domain=chandu.com

Step7: go to  \tomcat\shared\classes  ---- > alfresco-global.properties uncomment these lines.


# IMAP
#-------------
imap.server.enabled=true
imap.server.port=143
imap.server.host=localhost


Step8: restart the server and go to outlook to compose a mail ., with to address as companyadmin@chandu.com.
 you will get mail as document in mycompany space. and also you can find the alfresco folders in outlook.


here some information is available and also screen shots also .

http://wiki.alfresco.com/wiki/IMAP